Creating Relationships
|
Creating Relationships |
|
|
Many database systems are relational. This means that instead of having one very large file that contains all information, common information is separated out into multiple tables and linked together by some type of reference or ID field. The database system then manages all the different tables and the links (or relationships) between each of them.
When you are performing analysis on data files, you may find you have multiple files that are related in this same way. However, because they are outside the database system, you may need to "put them back together" in order to accomplish your task.
Strata enables you to perform this type of work with the Relationship Panel. A simple relationship may be between two different tables, each having one field in common. You can relate the two tables on this common field in order to join the tables together. Strata also lets you perform additional analysis with these related tables, such as filtering on the related records, adding fields from one table to another and using aggregate functions.
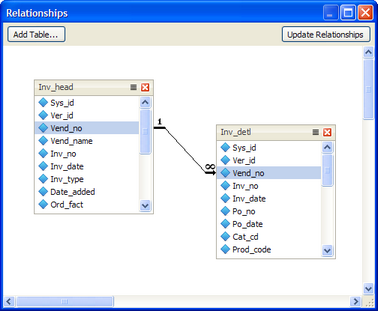
Using the Relationships Panel
To create a relationship, select Relationships from the Tools menu and the relationships panel will appear in a dialog. You can also toggle the relationships panel on or off using the relationship icon at the bottom left corner of the screen.
Adding Tables
To add tables to the relationships panel, either drag them into the dialog from the project panel or click the Add Tables button on the top left.
Linking or Relating Tables
Once you have two or more tables that have fields in common, you can join them together. To do this, select a field from the main (parent) table to the related field in the second (child) table. The parent table will drive the relationship of all child tables.
Tables will remain in Relationships Panel until you delete them (even if you close the dialog). To delete relationships, right-click on the black "link" between the two tables and select Delete Relation. To delete tables, simply right-click the red "x" on the top right corner of the table.
Activating and Updating Relationships
When your relationship is set, you need to activate it. To do this, click the Update Relationships button on the top right corner of the dialog. A relationship process will commence. The time it takes to create the relationship will depend on the size of the tables.
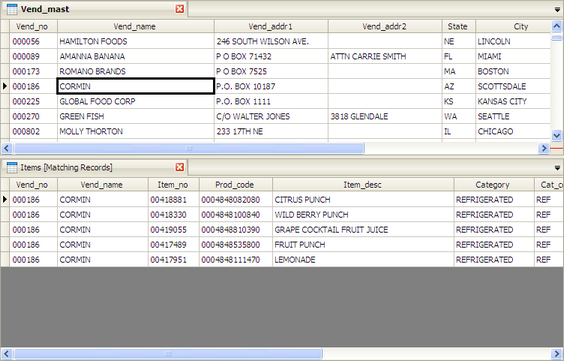
Filtering on Related Data
When two tables are joined together by a common field, Strata lets you view the individual child records that relate to a single parent record. You can click through each record in the parent table, and view the corresponding records in the child table.
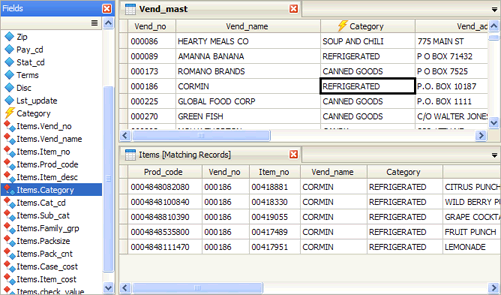
For example, let's say you had two tables -- one that contained supplier information and one that contained supplier transaction information. The first table would contain general information, such as supplier ID, name, address and terms. The second table would contain the transactions related to the supplier, such as date of purchase, quantity and price. The second table would generally contain many more records (individual transactions) than the vendor information file.
Filter Related Records Only
You may choose to view the related records in your child table and nothing else. Just select any individual record in the main file and see the corresponding detail in the transaction file.
To filter on related records, do the following:
1. Create a relationship on a common field, as discussed in the previous section.
2. Tile the tabs horizontally, so that you can see both tables at one time.
3. Select Related Records from the Data menu and then choose "Filter Related Records." You can also activate this using the Filter Related Record icon drop-down on the Bookmarks toolbar.
4. In the parent table, select individual records; only the related records in the child table will be shown.
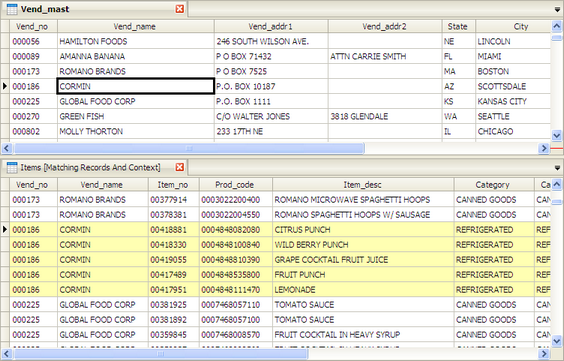
Mark Related Records
You may choose to view the related records in your child table and nothing else. Just select any individual record in the main file and see the corresponding detail in the transaction file.
To mark related records within the child table, do the following:
1. Create a relationship on a common field, as discussed in the previous section.
2. Tile the tabs horizontally, so that you can see both tables at one time.
3. Select Related Records from the Data menu and then choose "Mark Related Records." You can also activate this using the Filter Related Record icon drop-down on the Bookmarks toolbar.
4. In the parent table, select individual records; the related records in the child table will be marked in yellow in context with non-related records.
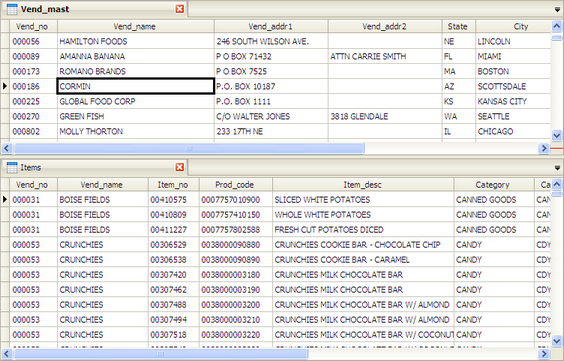
View Related Tables Without a Filter
If you wish, you can create a relationship and not filter for the child records.
To remove a filter on related records, do the following:
1. Select Related Records from the Data menu and then choose "No Relationship Filter or Mark." You can also activate this using the Filter Related Record icon drop-down on the Bookmarks toolbar.
2. In the parent table, select individual records; the child table records will no longer update to correspond with the selected parent record.
Adding Related Fields and Creating Calculations
When you have successfully related the tables together, you can also integrate fields from one table into the other as well as create calculations between the two tables.
Adding Fields from Child Sets to Parent Sets
Once tables are related together, you can insert fields from a child table into a parent table. It is often extremely useful to add additional information into the parent set.
To add fields, do the following:
1. Open the Fields Panel. You can do this by selecting Fields Panel from the View menu or by toggling the fields panel icon located on the bottom left of your screen.
2. Select a record in the parent table (to set the focus to the parent). The fields panel will be populated by all the original table's fields as well as all the fields from the child table.
3. Drag one of the child fields (designated by the "tablename.fieldname" syntax) into the parent table. The child field will appear in the parent table as a calculated field.
NOTE: Because these child fields appear in the parent as a calculated field, they only persist as long as the two tables are related. If you uncouple/delete the relationship, the calculated fields will no longer be able to reference the related child table. Therefore, if you wish to remove the relationship, but keep the calculated field, you need to transform it into a fixed, static field. To do so, right-click on the calculated field header and select "Convert to Fixed Fields."
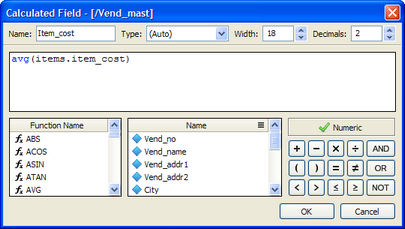
Using Aggregate Functions from Child Sets to Parent Sets
When you drag a child field to the parent table, Strata is actually just automating the creation of a new calculated field based on the child table. In this case, it uses the "FIRST" function:
FIRST(childtablename.childfieldname)
This function tells the calculated field to choose the first item in the list of child records and show it in the parent table. However, in addition to using the "FIRST" function, you can also use other aggregate functions, such as SUM, MIN, MAX, AVG. These aggregate functions perform the following tasks:
So, if you had a numeric field in your child set, say the price of an item, you could show the average price for all child records in the parent table.
So, in addition to showing the first item in the list, you can also use these additional aggregate functions for additional data analysis on related tables.
NOTE: Because these child fields appear in the parent as a calculated field, they only persist as long as the two tables are related. If you uncouple/delete the relationship, the calculated fields will no longer be able to reference the related child table. Therefore, if you wish to remove the relationship, but keep the calculated field, you need to transform it into a fixed, static field. To do so, right-click on the calculated field header and select "Convert to Fixed Fields."
|