Importing Data Sets
|
Importing Data Sets |
|
|
Accessing and Saving Data > Importing and Exporting Data > Importing Data Sets
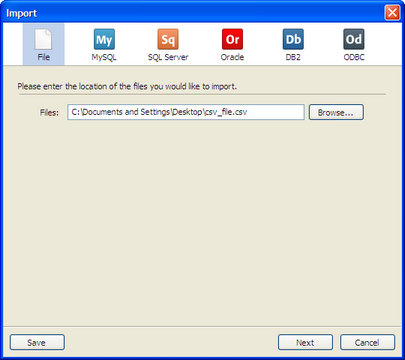
Strata enables you to import local data files or tables from external database systems. To begin an import process, select Import from the File menu. An Import dialog will appear:
The top section of the dialog lists the various types of imports you can perform. For instance, if you wish to import some CSV files, you would do this by selecting the File tab. If you wanted to import from your SQL Server database, you would select the SQL Server tab, etc.
Importing Text-delimited Files (CSV, TSV, TXT, etc.)
You can use Strata to import different file types, similar to the types of files you can open (e.g., DBF, CSV, MDB). Each of these imports use a similar process; the only exception are text-delimited files, which require you to first specify a delimiter.
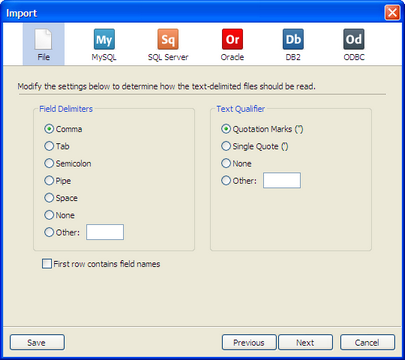
From the Import dialog, select the text file or files you wish to import. You can import different types of text-delimited files, but for any single-import process, each file type must be the same for any single import process. After browsing for your file(s) and clicking the Next button, the following page will open, where you can select your delimiters:
This settings page provides options to modify the way your text file is parsed, depending on how it is formatted:
Once you are finished, click the Next button to take you to the final page of the import. This final page is discussed in the next section below.
NOTE: The import dialog enables you to import any type of text-delimited file but not fixed-length files. To open a fixed-length file, you must use the Open functionality.
Importing Other File Types (XLS, XLSX, MDB, ACCDB, DBF, KPG)
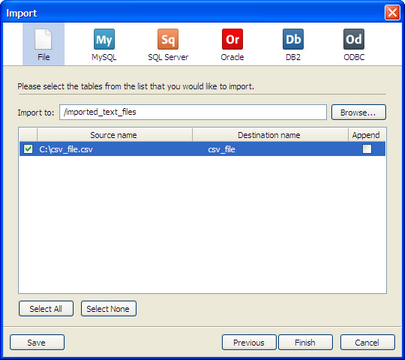
For all other file types (and, after you select your delimiter for text files), Strata provides a dialog to specify information related to your import. For instance, you can specify the names of the imported files, what folder, if any, your tables should be placed in and whether you want to append the data tables.
This page provides options to modify the way your file is imported:
As an example of appending files during an import, let's say that you had three CSV files (each having the same structure) named CSV1, CSV2 and CSV3, respectively, that you wanted to add to an existing table called MAIN in Strata. You would select each of the files, change each of their destination names to "MAIN" and check the append checkbox. Then you would select the "Import to" destination folder where "MAIN" resides.
Once you have configured your import options, press the Finish button and the files will be imported into your project panel.
Importing Data From Database Systems
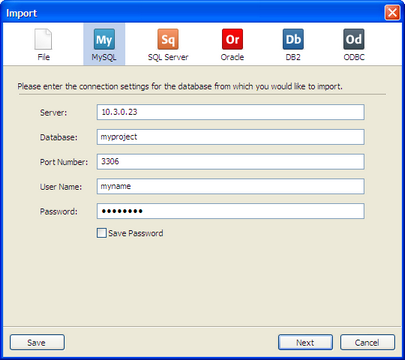
You may also import tables directly from external database systems, such as MySQL Enterprise, Microsoft SQL Server, Oracle, and IBM DB2. You may also import from other systems using an ODBC driver. To import from an external system, select the appropriate tab on top of the Import dialog and you will see a connection page.
To connect to the database, enter the connection information and then click the Next button. The required connection information is as follows:
If a connection is made, you will be taken to the Import settings page as discussed above.
NOTE: The option to import to MySQL, Oracle, SQL Server, DB2 and other database systems may first require the installation of appropriate database drivers. For example, you may need to download and install the MySQL Connector/ODBC driver for MySQL or the Oracle Call Interface (OCI) driver for Oracle. Please contact your system administrator for further information. Third-party drivers are in no way affiliated with Strata or its licensing agreement. Please contact the third-party providers of these drivers for further information on licensing and usage terms.
Saving Import Templates
For imports that you perform on a regular basis, it is useful to be able to save your template to reuse at a future date. To save an import, simply create your template as normal and before selecting the Finish button on the final page, click the Save button instead. Then, select a name for your import template and click OK. Finally, select the Finish button to begin your import. In addition to your import starting, an import template will appear in your project panel. To resuse the import template, simply double-click it and edit as needed before importing.
|