Marking/Highlighting Records
|
Marking/Highlighting Records |
|
|
Performing Standard Data Operations > Marking/Highlighting Records
When analyzing data on the screen, it is often helpful to be able to mark different records to highlight things that match a certain criteria. It helps break up the screen into different colors, which helps in data visualization. This section discusses the tools Strata provides so you can highlight data based on certain criteria.
Marking Records Based upon Criteria in a Cell
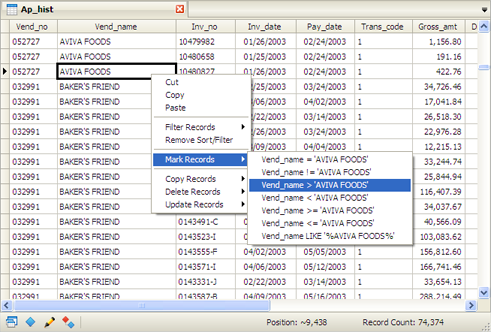
You can quickly mark a subset of records from a table based on criteria in a given cell.
In this example, we will mark all records in the table where the Vendor Name is equal to "AVIVA FOODS." To mark in this way, do the following:
1. Right-click on the cell that contains the criteria you want to use as the basis for marking records, then move the mouse over "Mark Records".
2. Select one of the options from the "Mark Records" sub-menu, such as marking records equal to the value, greater than the value, etc.
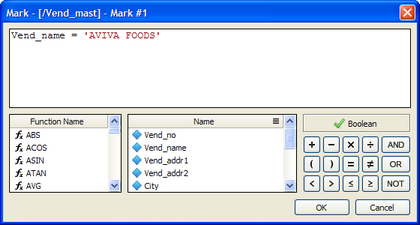
Marking Records Based upon a Formula
You can also use a custom formula to mark a group of records from your table. To do this, select "Mark Records" from the Data menu and the following dialog will appear:
As shown above, you need to enter in a Boolean formula with the appropriate criteria that matches the records you wish to mark. In the example above, we would mark the records where the field "Vend_name" is equal to "AVIVA FOODS".
Click the OK button and the appropriate records will be highlighted.
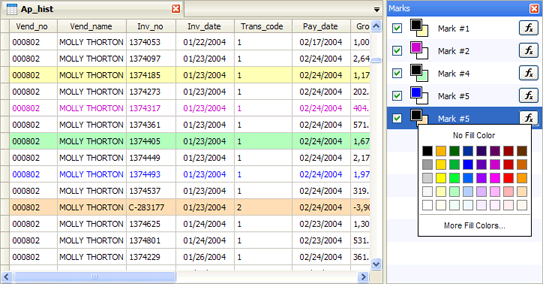
Using the Mark Panel
When you select "Mark Records" from the Data menu, in addition to the formula box, the Mark Panel also appears. You may also turn the Mark Panel on/off by selecting "Mark Panel" from the View menu or by clicking on the Mark Panel icon on the bottom left of your screen in the Status bar.
The Mark Panel offers you the following options for each Mark:
To delete a Mark, simply right-click on the Mark name and select "Delete Mark."
Using Marks to Perform Data Operations
Since a Mark is based upon a formula, you can quickly use it to perform other data operations. Right-click on any mark and you can quickly perform the following operations:
See the above links for further information about each of these data operations.
|