Sorting/Ordering Fields
|
Sorting/Ordering Fields |
|
|
Performing Standard Data Operations > Sorting/Ordering Fields
Sorting data is a fundamental tool for performing data analysis. It is often imperative to see records sorted or ordered in a certain way, either alphabetically, from lowest to highest, or by date. Strata provides two methods you can use to sort your data -- quick sort and using a custom order.
Using Quick Sort
To change the order of a column in your table, simply right-click on the field header and select either "Sort Ascending" or "Sort Descending". The table will sort accordingly.
If you want to sort using multiple columns as criteria, highlight each of the columns you wish to sort on and the right-click to sort ascending or descending.
NOTE: For multiple column sorting, Strata sorts from left to right, so you should move your columns in the order you wish to sort before performing an ordering operation.
Creating a Custom Order
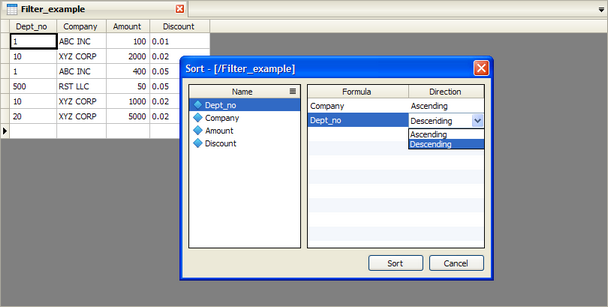
You can also create a custom order by selecting "Sort" from the Data menu. The following dialog will appear:
Select field names from the left side and drag them into the dialog to create the sort precedence. Then click under "Direction" and choose a sort direction from the drop-down menu. Click on the Sort button to sort your table.
NOTE: To pre-populate your dialog, simply highlight the field(s) you wish to use before selecting the Sort option.
Saving Indexes
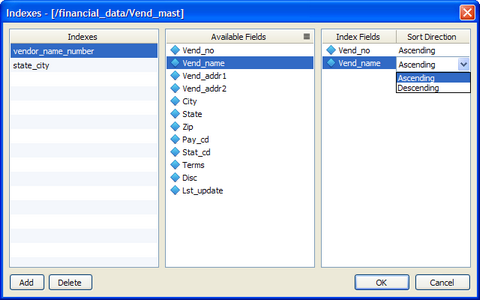
Indexes are the low-level database process that enables data operations like sorts and relationships. Strata enables you to save these indexes to increase the speed of your processing and analysis. For example, instead of sorting fields each time you use a table, you can just save the index. By saving the index, you will have access to "instant" sorts when you sort in the future. To save an index, select Edit Indexes from the Data menu and the following dialog will appear:
Click the Add button to create a new index. To rename the index, double-click the index name and edit the text. To create your index, drag fields from the Available Fields area to the Index Fields area. Lastly, in the Index Fields area, you may set the Sort Direction either Ascending or Descending by double-clicking and choosing the option from the drop-down menu. Click OK and a index creation process will begin. Once the process is finished, the table will be sort as requested and the index will be saved for future use.
If you sort a field that has a saved index, the sort will happen instantly. However, instead of manually sorting, you may also quickly access your indexes by right-clicking on any field header and selecting Sort Orders from the menu. The menu will expand to show all the saved indexes for your table. Click a saved index and the table will sort as expected.
NOTE: Saved indexes should be named similar to the way fields are named. Therefore indexes cannot have duplicate names, cannot begin with numbers or a period, and cannot contain spaces or any of the following characters: ~!@#$%^&*()+{}|:"<>?`-=[]\;',/
Reverting Back to the Default Order
In order to get back to the natural order of your table, simply select "Remove Sort/Filter" from the Data menu. Your table will then appear in its original order.
|