Using the Source View
|
Using the Source View |
|
|
Accessing and Saving Data > Viewing Data Sets > Using the Source View
When opening text files, whether delimited of fixed-length, Strata provides a special Source View that enables you to change the text parameters. If, for instance, a comma-delimited file was incorrectly interpreted as a fixed-length file, you can manually change this parameter so your data displays correctly in the Table View. Similarly, if your field headers are displayed as the first record, you can easily change this so that they display properly as the headers.
The Source view provides different controls for both text types -- text-delimited and fixed-length, as discussed below. To open the Souce View for a file, select "Source" from the View menu or toggle the View icon found in the upper-right hand corner of the software.
Working with Text-Delimited Files
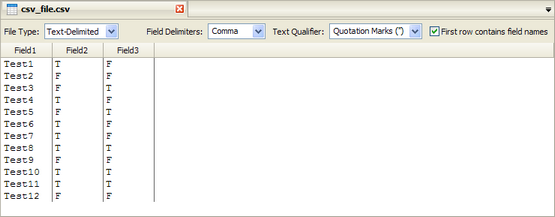
If you table is a text-delimited file, the source view will show the following page and controls:
In this example, we have a comma-separated text file that, in is raw form, would look like this:
"Field1","Field2","Field3" "Test1","T","F" "Test2","F","F"
You can use the source view to change the parameters of your table as follows:
As you change these parameters, the source view will update to show how the data will display in your table.
Working with Fixed-length Text Files
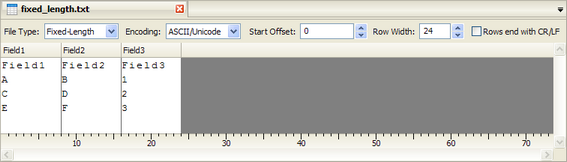
If your table is a fixed-length file, the source view will show the following page and controls:
Common Fixed-length Files
In this example, we have a fixed-length text file that, in is raw form, would look like this:
Field1 Field2 Field3 A B 1 C D 2 E F 3
You can use the source view to change the parameters of your table as follows:
Once you have set the parameters of your file, you may select the fields:
NOTE: Because there are no delimiters to determine field names, you'll need to add the field names manually. You can do this by double-clicking on the field header and editing the name. In the above example, you would first set your fields, then rename the field names, and finally change the "Skip Beginning Characters" to 22, in order to skip the field names in your data.
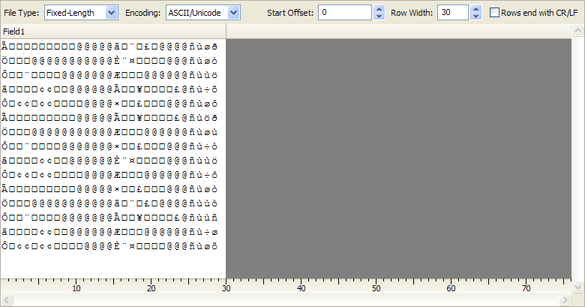
EBCDIC Files
EBCDIC files are encoded in a non-ASCII format. Prior to being usable in Strata, it first needs to be converted to ASCII. After opening an EBCDIC file, the table will look something like this:
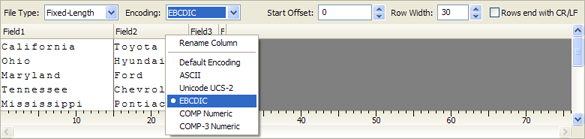
To convert to ASCII, select "EBCDIC" from the Encoding menu, which will change the characters to ASCII text. After converting the file and adding the field breaks, right-click on each field header and select the proper encoding style.
NOTE: Because there are no delimiters to determine field names, you'll need to add the field names manually. You can do this by double-clicking on the field header and editing the name. In the above example, you would first set your fields and then rename the field names.
Viewing the Table and Editing the Structure
Once you are finished setting the fixed-length columns, you can view your table by toggling to the Table View or edit the structure in the Design View.
|