Working with Sorts and Groups
|
Working with Sorts and Groups |
|
|
Designing and Printing Reports > Working with Sorts and Groups
When creating more complex reports, you often will need to sort various fields and/or group like-data together. For instance, if your data includes a date, you may want to sort it so that the earliest date shows first in the report. Or, if you wanted to show a customer list by country, instead of listing the country name on each detail record, you could simply group on the country name so it only appears once -- with all the detail related to that country following in the detail section.
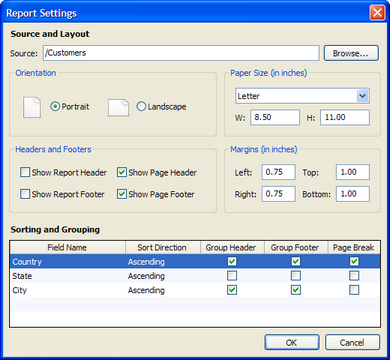
You can set up your sorts and group in the bottom section of the Report Settings Dialog.
Sorting Fields
To sort a field in your report, you simply need to enter your field in the Field Name section, select the sort direction you want (ascending or descending) and then make sure the header, footer and page break check boxes are unchecked (these are used for groups; see below). Click the OK button and toggle to the Layout View and your report will be sorted accordingly.
For example, if you grouped on a field of animal names and sorted ascending, the group of "aardvarks" would be first in the report and the group of "zebras" would be last in the report. You may also sort on multiple fields in this dialog. The first field in the list will be sorted first, the second field will be sorted second and so on.
Grouping Controls
Before walking through a grouping example, first we'll look at the controls that define how your data is grouped and sorted:
You are required to place your groups in the desired order in the settings dialog. The group on the first row will be grouped first, then the second row and so on. This is particularly important because the second group inherits properties of the first group and the third group inherits properties of the second group, etc.
As an example, if we have two groups, Country and City, and set a Page Break to break after each City group, we would expect that a new page would begin every time a new City group appeared. However, the City, in this case, inherits from the Country. So, if we had two groups: "USA, Dublin" and "Ireland, Dublin" the page break would also occur in between these two groups, even though the City is the same for each group. This is because "Dublin, USA" is a different group than "Dublin Ireland".
Report Grouping Example
To help clarify the grouping functionality, we'll look at an example using a table of sample customer data:
We can see various groups within this data, such as:
So, let's say that we wanted to create a report that shows Customer name and Totals, broken out by City. We'll want to see a basic recurring pattern in our report that looks like this:
City Name [GROUP HEADER] >>Company Name and Total [DETAIL] >>Company Name and Total
City Name >>Company Name and Total >>Company Name and Total
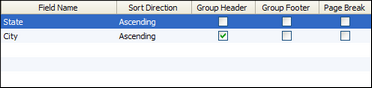
To do this, we need to create a group based on the City. However, we see that there are two cities in our data called Elmhurst -- one is in the state of New York and the other is in the state of Illinois. Therefore, if we are going to group on cities, we need to be careful to also use the State when defining our group.
In the screenshot above, we group on both State and City. However, we only need to show a Group Header for the City, since we are not breaking out the report by groups of States too. Then in the Design View, we would add the field "City" to the Group Header section and the fields "Company" and "Total" to the Detail section.
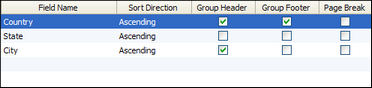
If we wanted to instead break out the report not only by City, but also by Country, we would define the groups as follows:
In this example, we group on Country, State and City. We'll continue to show a City Group Header, but we'll also add a Country Group Header and Country Footer to this report. It will follow this recurring pattern:
Country Name [GROUP HEADER]
>City Name [GROUP HEADER] >>Company Name and Total [DETAIL] >>Company Name and Total
>City Name >>Company Name and Total >>Company Name and Total
Total per Country [GROUP FOOTER]
Country Name
>City Name >>Company Name and Total >>Company Name and Total
>City Name >>Company Name and Total >>Company Name and Total
Total per Country (Group Footer)
Here we are not just providing a list of Cities and related Companies, but we are dividing the report by Country as well. In addition, we've included a Country Group Footer, where we are able to define subtotals. In this case, we would create a subtotal per Country. If we checked the Page Break box next to the Country group in the Report Settings, each time a new country appeared in the report, the new group would begin on a new page.
Learn More
For further information regarding using groups in a report, see the following sections:
|