Creating a New Data Table
|
Creating a New Data Table |
|
|
Performing Standard Data Operations > Adding and Removing Data > Creating a New Data Table
Although Strata is primarily a tool meant for analyzing existing data tables, it is useful to have the ability to create new data sets as well.
To create a new data set, do the following:
1. Select New > Table from the File menu or click on the "New" icon from the Bookmarks Toolbar and pick the Table option.
2. An empty data set in the design view will appear in a new tab. Before entering actual data, you first need to provide the structure for you new table, which includes the field names, the types (character, numeric, etc.) along with the width and decimal places. To create new fields, double-click on the row under the "Field Name" header and enter the structure information.
3. When you are finished adding your fields and related structure information, select Table View from the View menu to switch to the table view. You will be asked to save your table. Provide a table name, click Save and your new table will be added to the project panel.
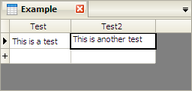
4. Once in the table view, you will see the structure you set up without any data. In order to add data, you just need to double-click in the cell next to the arrow. A new blank row will appear and you can enter your data. Then double click on the blank cell to get a cursor where you can add your data:
5. To add additional rows, just double-click on the bottom blank row again to create new blank records and continue adding new data.
NOTE: In order to add data to a table, you must first go to the Edit menu and make sure that "Protect Data" is turned off (unchecked).
|