Using Report Settings
|
Using Report Settings |
|
|
Designing and Printing Reports > Using Report Settings
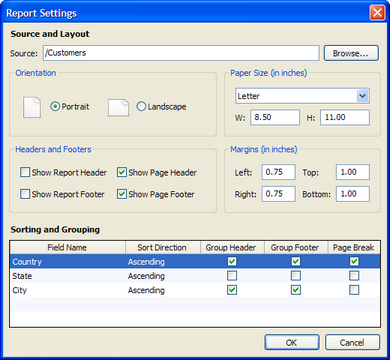
Report settings let you define what data set to use for your report, the page layout settings and the options available in your design view. The settings also enable you to specify the groups you need for your reports. To define your report settings, click the Report Settings icon (located on the far left side of the formatting toolbar) and the Report Settings dialog will appear.
Source Table
In order to create a report, you first need to define the source data that the report is based upon. You can define a source in the Report Settings by selecting the Browse button and then choosing a table or query from your project.
Additionally, when you first open a report, you can simply double-click anywhere on the report to immediately define your source table or query. Once a source is defined, it will appear in the Status bar as follows:
Source: /MyDataSource
Page Layout
The Report Settings dialog also enables you to customize the page layout for the report:
The default page layout options can be changed by changing your report preferences. To change these preferences, select Options from the Tools menu and then select the Report tab. There you may also change your default font and font size.
Headers and Footers
The Report Settings also lets you turn on and off the different sections of the report you'd like to work with. A report detail area of a report will always appear in the Design View, but the other sections can be included or excluded as you wish. The sections are as follows:
You may also include Group Headers and Group Footers; see the Sorting and Grouping section at the bottom of the dialog. For details about how these sections work within a report, see Working in the Design View in the section called "Working with Report Sections."
Sort and Group Settings
You can create sorts and groups for your report using the Sorting and Grouping control. For further information see Working with Sorts and Groups.
|