

Exploring Calculated Fields: Part I - The Basics
 Calculated fields are one of the cornerstones of data analysis. It's just one of those tools that you end up using again and again. And, if you can master the functions and formulas and make them do your bidding, you'll be well on your way to becoming a data Jedi. This article begins a multi-part blog series on using calculated fields in your projects.
Calculated fields are nothing more than a way to apply a formula to existing columns or fields. (As a quick aside, spreadsheets use the terms row/column, whereas databases use the terms record/field — there are some technical differences, but for our purposes here, they are very similar). A poor man's calculated field is found in a spreadsheet; you create a formula in a blank cell and then drag the cell down to apply it to the other rows. The more traditional calculated field is found in the database world. Here you create a new field that encapsulates a calculation and then you run it across the entire table.
With Kirix Strata, you get a calculated field like that found in the database world, but with the dynamic/instant properties you get in the spreadsheet world. So, when you create a calculated field in Strata, you get a calculation that applies to the entire data set instantly — whether its 10 rows or 10 million. In addition, these fields behave like regular ol' fields, so you can reference them in other calculated fields or use them in your sorts, filters, groups, relationships, queries and other operations. Of course, the actual data can't be edited like in a regular field, but the underlying formula can be tweaked — with the results showing up in your view in real-time.
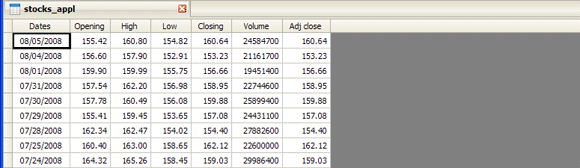
Let's create some simple examples to show how calculated fields work. We'll look at the historic stock prices of Apple Computer (to try this yourself, just click the “Download to Spreadsheet” at the bottom of the web page and it will open up into a table in Strata):
To create a calculation, either click on the calculated field icon on the toolbar or right-click on any field name and select “Insert Calculated Field.” Here are five basic categories of tasks you can perform with calculated fields:
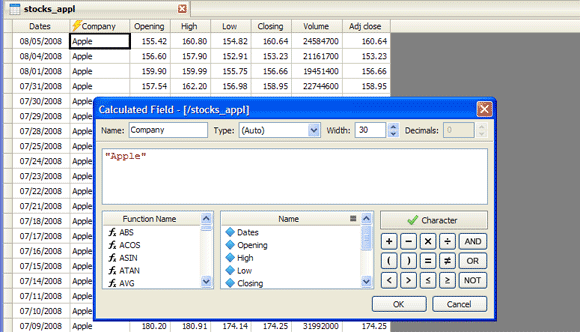
1. Calculations for Entering Text and Numbers
At the most basic level, you can type anything into your formula builder and it will appear instantly in your calculated field. For example, if you type in the number 3 it will appear in each cell. If you type in the formula 3 + 3, a 6 will appear in every cell. In this example, we'll add the name of the company, “Apple”.
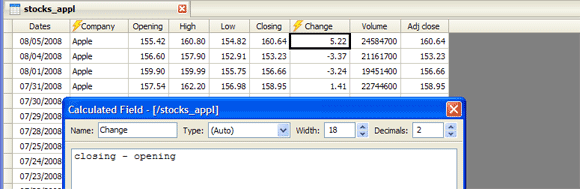
2. Calculations Based upon Fields (variables)
Calculations are far more interesting when you begin referencing other fields. In a spreadsheet, you reference other cells like “A4″ or “C5″. In a database, you reference the field names. So, in our example, let's say we wanted to find out the difference between the opening and closing price:
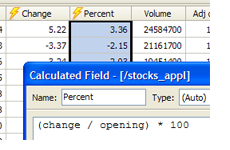
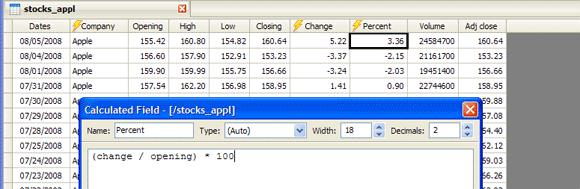
3. Calculations Based upon other Calculations
Since calculated fields behave just like normal fields, you can reference them in other calculated fields. In this example, we'll calculate the percentage change using the “Change” field we created above:
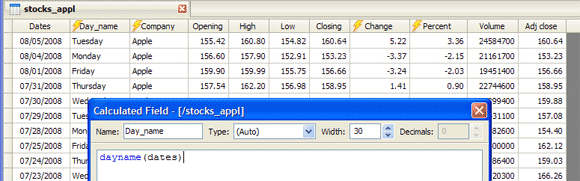
4. Calculations Using Functions
The real power of calculated fields comes from the use of functions. Functions are a bit of text you add to the formula to do certain things. You'll find these in spreadsheets — in fact, we previously wrote a post about the Concatenate function in Excel. Strata has a bunch of different functions that you can explore in more detail. However, for this example, we're just going to show the name of the day for each date in our table by using the DAYNAME() function:
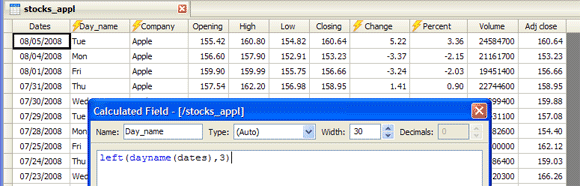
5. Nested Calculations
Another nice thing about formulas is that you can nest your calculations. That is, instead of creating a new calculated field for each calculation, you can just create more complex calculations in a single go. In this case, we'll use the LEFT() function to only show us the 3 leftmost letters, so we only see the day name abbreviation:
That was a quick run-through of calculated fields. For more on how they work, including types, widths and decimal places, see the calculated field help page. For further information on the different functions you can use, see the functions help page. Also, here's a video that goes through the same process:
Of course, calculated fields can do much more than create basic calculations. In the next part of this series, we'll look at how you can use calculated fields to extract values from columns.
Got any questions on this post? Let us know by posting a comment below and we'll be happy to help.
August 14th, 2008 at 5:45 pm
[…] Strata Blog « Exploring Calculated Fields: Part I - The Basics […]